
7 Piriformis Stretch Variations Ranked by Ease: Hold 30–60s, Aim for 6/10

Essential ChiroCare Blogger • September 24, 2026

7 Piriformis Stretch Variations Ranked by Ease: Hold 30–60s, Aim for 6/10

The safest starting point for most people is the supine figure-4, followed by the seated and standing versions once that feels controlled and painless. Pigeon pose goes deeper but demands healthy knees and should come later, if at all. The one rule that overrides everything else: stop immediately if you feel numbness in the groin or inner thighs, spreading leg weakness, or symptoms in both legs at once, and get evaluated. Stretching works best anyway when it's paired with glute and core strengthening rather than treated as a fix on its own.

TL;DR:

  • Initiate stretching with supine or supported variations before progressing to deeper poses like pigeon or four-point kneeling, depending on your symptom response.
  • Hold stretches for 30 to 60 seconds at a gentle sensation level of around 6 out of 10, repeating 2 to 4 times per side, and avoid pushing into pain or numbness.
  • Stop stretching immediately if numbness, weakness, or sharp pain occurs, especially if symptoms spread below the knee or affect both legs.
  • Combine stretching with glute and core strengthening exercises to address underlying imbalances and improve long-term hip stability.
  • If symptoms persist past two to three weeks or red-flag signs appear, seek professional assessment to rule out nerve issues and develop a staged, comprehensive treatment plan.
piriformis stretch variations

Table of Contents

Seven Piriformis Stretch Variations You Can Try Today

Not every version of a piriformis stretch belongs at the same stage of recovery. Clinical guidance generally orders them from gentle, spine-friendly positions to deeper stretches that load the hip and knee harder, and that progression matters more than most people realize. Jumping straight to pigeon pose because it looks impressive on social media is how a lot of people aggravate symptoms that a gentler version would have calmed down.

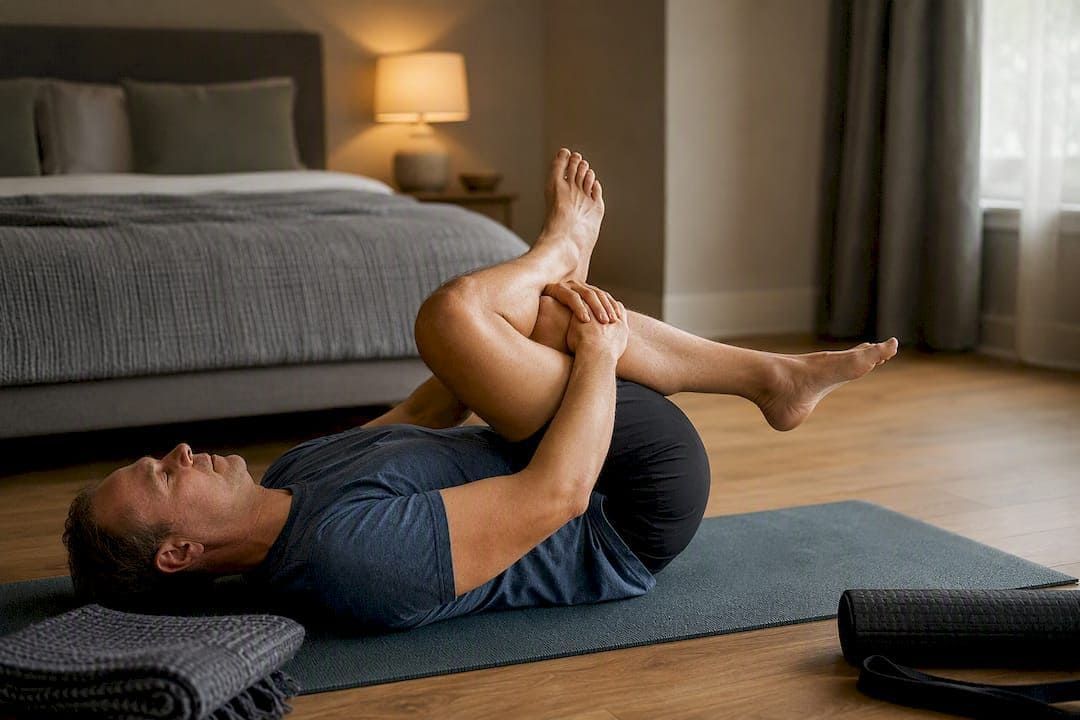
Supine figure-4. Lie on your back, knees bent, feet flat. Cross one ankle over the opposite knee, then draw the resting-leg's thigh toward your chest until you feel a stretch through the outer hip of the crossed leg. Keep your lower back flat against the floor rather than letting it round. Loop a strap or towel behind the thigh if your hands can't comfortably reach.

Supine knee-to-opposite-shoulder. Instead of crossing the ankle, pull the bent knee diagonally toward the opposite shoulder. This variation glides the piriformis along a slightly different angle and often suits people who find the crossed-ankle position pinches at the hip.

Ankle-over-knee, seated (chair figure-4). Sit tall in a chair, cross one ankle over the opposite knee, and hinge forward from the hips while keeping your spine long. This is a practical office-desk version and a good next step once the floor variation feels easy.

Seated figure-4 with wall support. Same setup, but sit against a wall for extra stability if balance or core control is limiting your forward hinge.

Standing figure-4 (supported). Stand near a wall or countertop, cross one ankle above the opposite knee, and slowly sit the hips back while holding the support. This builds the stretch into a functional standing position, useful for people who spend their day on their feet.

Four-point kneeling stretch. From hands and knees, slide one knee forward and out to the side, extending the opposite leg back. This adds hip flexor length to the piriformis stretch and demands more control through the pelvis.

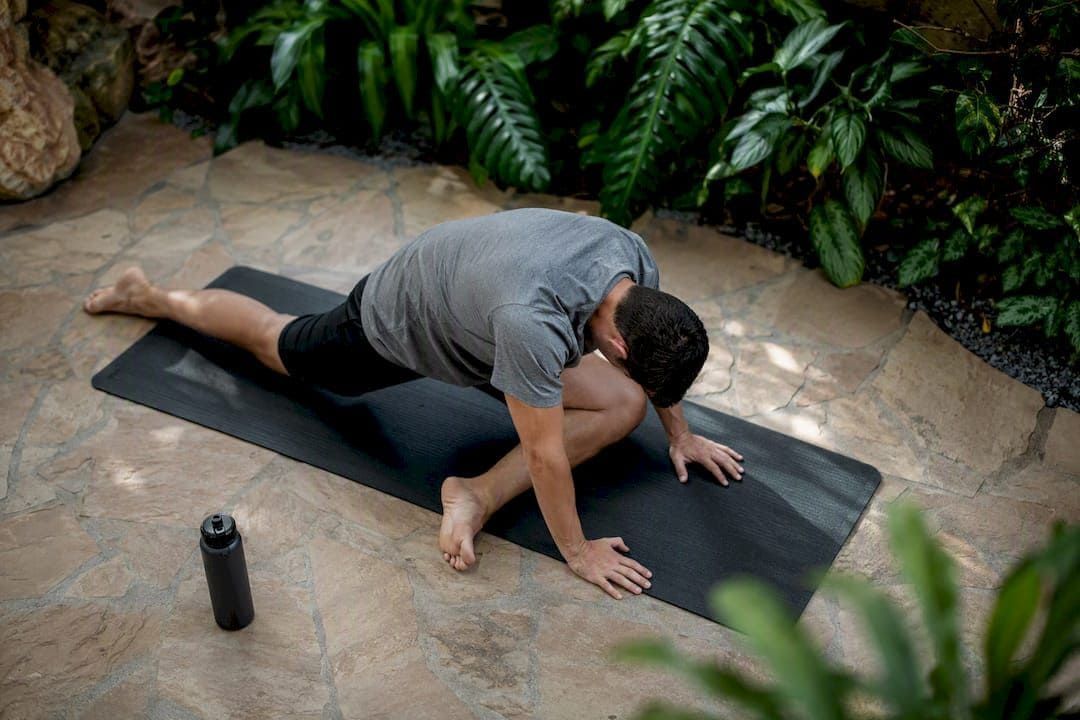
Modified half-pigeon. The deepest option here. Bring one shin across the body while the back leg extends behind you, keeping the front foot far enough forward to protect the knee. Use a cushion under the front hip if the stretch feels lopsided. Skip this one entirely with any history of knee injury or meniscus trouble.

Across all seven, clinical guidance from Cleveland Clinic points to holding each position 30 to 60 seconds and repeating 2 to 4 times per side, which lines up with what most physical therapy plans recommend.

  • Keep the lower back neutral. Avoid letting it round or arch to "reach" the stretch.
  • Breathe normally throughout; holding your breath tightens the whole hip region.
  • Move into each position slowly. No bouncing or sudden drops into depth.
  • Stop the moment you feel a stretch tip into sharp or radiating pain.

Pro Tip: Rate the stretch sensation on a 0 to 10 scale and aim for around a 6. Anything past that usually triggers a protective muscle guard that undoes the benefit you're going for.

Choosing the Right Variation and Progressing Without Setbacks

Start with a supine, supported variation. Not because the others are wrong, but because lying down takes gravity and balance out of the equation, so you can feel exactly how your hip responds. If a supine version reduces tightness and stays comfortable over a few sessions, you've got a green light to progress.

  1. Test the supine figure-4 or knee-to-opposite-shoulder version for a week.
  2. If symptoms ease and nothing sharpens, move to seated or standing supported variations.
  3. Add pigeon or four-point kneeling only once those feel controlled and pain-free.
  4. If a stretch reproduces tingling, numbness, or shooting pain down the leg, drop back a stage.

Intensity control matters more than reaching a deeper position. Hip Preservation's clinical commentary puts the target around a 6 out of 10 sensation, held for 30 to 60 seconds, repeated 2 to 4 times.

If stretching brings relief but symptoms keep returning within a day or two, that's a signal to add strengthening, not more stretching. Glute bridges, clamshells, and hip abductor work address the underlying imbalance that keeps recreating tightness. Combined-therapy research backs this pattern: flexibility work paired with glute and core strengthening improves joint stability far more reliably than stretching alone.

One screening step belongs before any of this: piriformis-like pain sometimes originates in the lumbar spine, not the hip. Ruling that out first prevents stretching an already irritated nerve root.

Mistakes That Turn a Helpful Stretch Into a Setback

Technique errors are the most common reason a piriformis stretch stops feeling helpful. A rounded lower back shifts the load off the hip and onto the spine, which can aggravate the very nerve irritation you're trying to calm. Forcing the knee toward the floor in pigeon pose, especially with stiff hips, strains the knee joint instead of the piriformis. Jerky, bouncing movements into a stretch trigger a reflexive muscle guard rather than a release. Holding your breath tightens the hip flexors and glutes right when you're trying to relax them.

  • Rounding or flattening the lower back to force a deeper stretch
  • Pushing the front knee toward the floor in pigeon pose
  • Bouncing into position instead of easing in slowly
  • Holding your breath through the stretch
  • Ignoring pain that spreads below the knee

Certain symptoms mean stop stretching and get assessed, full stop.

Numbness in the groin or inner thighs (saddle anesthesia), progressive weakness in one or both legs, new symptoms affecting both legs at once, or pain that sharply worsens after a stretch are not signs to push through. They're signs to see a clinician for a neurological exam.

Clinicians often use bedside screens like the FAIR test, Pace's sign, or the modified Beatty test to check whether symptoms are truly coming from the piriformis or from a lumbar nerve root. If any red flag shows up, regress to gentle supine supported positions only, and hold off on deeper stretches until you've been evaluated for lingering leg pain.

piriformis stretch exercises

A Simple Routine to Start With This Week

Warm up for five minutes first. A brisk walk or gentle hip circles gets blood into the area before you stretch cold tissue.

  1. Supine figure-4: 30 to 60 seconds, 2 sets per side.
  2. Seated figure-4 (chair): 30 seconds, 2 sets per side.
  3. Standing supported figure-4: 30 seconds, 2 sets per side.
  4. Glute bridges: 3 sets of 10, three times a week.
  5. Clamshells: 3 sets of 10, three times a week.

Increase hold time or move to a deeper variation only once the current routine feels fully controlled with no symptom flare afterward. If tightness or leg symptoms persist past two or three weeks of consistent work, that's a reasonable point to bring in a professional rather than keep guessing. A structured look at physical therapy exercises for pain relief can help fill in the strengthening side once stretching alone plateaus.

How Essential Chirocare Approaches Piriformis Tightness

Cee, on staff at Essentialchirocare, has seen the same pattern play out repeatedly: patients arrive having done pigeon pose for weeks with no relief, when a gentler supine variation paired with hip strengthening would have gotten them further, faster. The clinic's approach starts with screening to confirm the piriformis, not the lumbar spine, is the actual source, then builds a staged plan: manual therapy to reduce guarding, supported stretches to restore range, and targeted strengthening to keep the improvement from sliding backward. One recurring pattern among patients following this staged model is measurable improvement in hip mobility and reduced leg symptoms within a few weeks, once stretching stopped being the whole plan and became one part of it.

If home stretching hasn't resolved your symptoms, or if you're dealing with any red-flag signs, Essentialchirocare's chiropractic care team across Tampa, Brandon, Sarasota, Lakeland, and Pinellas Park can screen for the actual source of the pain and build a plan that pairs manual therapy with the right strengthening progression. For readers still building their strengthening base at home, Strength and Conditioning Education's mobility resources offer a solid primer on why hip stability work matters alongside flexibility.

Sources

This article is general information, not a substitute for advice from a qualified doctor. Consult a qualified healthcare professional about your own circumstances before acting on anything here.

Recommended

kinesio tape for knee pain
By Essential ChiroCare Blogger • September 23, 2026
Evidence‑based, clinician‑checked self‑taping and rehab tips for adults. Kinesio tape can give modest, short‑term knee pain relief when paired with exercise.
chiropractic care and digestive health
By Essential ChiroCare Blogger • September 22, 2026
Discover the role of chiropractic in digestive health. Explore how chiropractic care may alleviate digestive symptoms and improve well-being.
sports injury treatment Tampa
By Essential ChiroCare Blogger • September 21, 2026
Discover how a sports chiropractor in Tampa can help with faster recovery, injury prevention, and peak performance before and after weekend tournaments.
spinal decompression side effects
By Essential ChiroCare Blogger • September 20, 2026
Learn what to expect from spinal decompression therapy, including common side effects and effective recovery tips to ease discomfort.
cervicogenic headache treatment
By Essential ChiroCare Blogger • September 19, 2026
Discover effective cervicogenic headache treatments that prioritize physical therapy and personalized care for lasting relief. Start your journey today!
movements that cause back pain
By Essential ChiroCare Blogger • September 18, 2026
Learn which everyday movements can worsen back pain and discover simple modifications to protect your spine and improve comfort.
sports chiropractor Lakeland FL
By Essential ChiroCare Blogger • September 17, 2026
Learn how an athletic chiropractor in Lakeland helps evaluate youth sports injuries and supports recovery with holistic, personalized care
Patient receiving cervical traction
By Essential ChiroCare Blogger • September 16, 2026
Clinic-led chiropractic care using CBP traction, targeted adjustments, and a realistic home program produces measurable posture gains in weeks.

knee pain chiropractor Tampa
By Essential ChiroCare Blogger • September 15, 2026
Learn common red flags, causes, and next steps for relief, including when to visit a knee pain chiropractor in Tampa for targeted care. Check this out!
Spinal Manipulation
By Essential ChiroCare Blogger • September 14, 2026
Learn how spinal manipulation in Tampa supports mobility, pain relief, and recovery in hot weather, with tips for staying safe and comfortable.
Show More